If you’re having trouble accessing your DVR for remote viewing, try these simple steps:
Ensure the Latest Firmware: Make sure your DVR has the latest firmware to ensure reliability. Click here for firmware instructions.
Check Ethernet Connection: Verify that the DVR is firmly connected to the router using an Ethernet cable. Avoid using a WiFi extender as it can cause network issues. Try reconnecting the cable or using a different one.
If you still need assistance, contact us at service@tigersecu.com for remote support. To expedite the process, please send us your DVR’s Network Page, QR Code Page, and password. You can find this information in the DVR Main Menu, Network Menu. We will respond within 12 hours.
For those who prefer to troubleshoot directly, follow these steps:
Troubleshooting Steps
Check Network Settings:
Go to the DVR Main Menu, Network Menu.
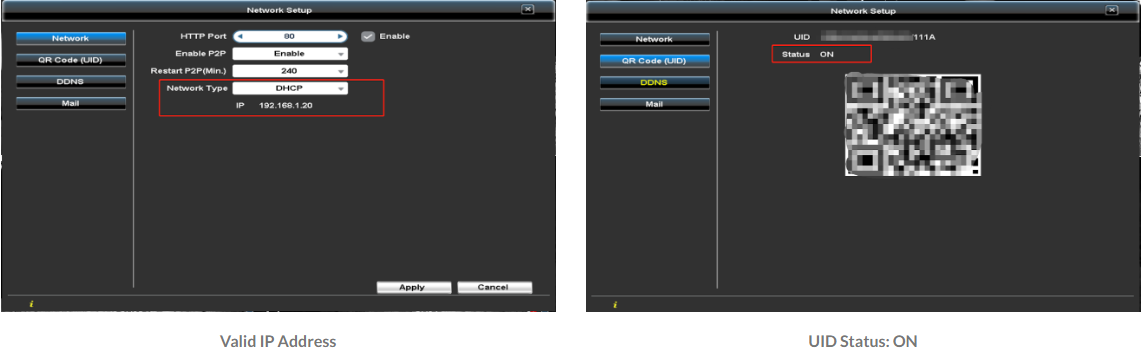
Ensure the network type is set to DHCP, then select Apply to see if a valid IP address appears.
Check the QR Code page to see if the UID status is switched to “ON”.
Valid IP Address and QR Status “ON”:
Check your network speed and email the results to service@tigersecu.com. We need this information to adjust your settings.
If the network’s upload speed is below 5 Mbps (for a 4 Channel DVR) or 10 Mbps (for an 8 or 16 Channel DVR), reduce the DVR’s bitrate:
Go to DVR Main Menu > Record Menu > Video & Audio.
Change the Quality setting from High to Custom and lower the bitrate for sub-stream (remote viewing) to 256.
Copy to All and Apply.
Try accessing your DVR remotely again.
If these steps don’t resolve the issue, contact us at service@tigersecu.com with your DVR’s Network Page, QR Code Page, and password for remote support. We will respond within 12 hours.
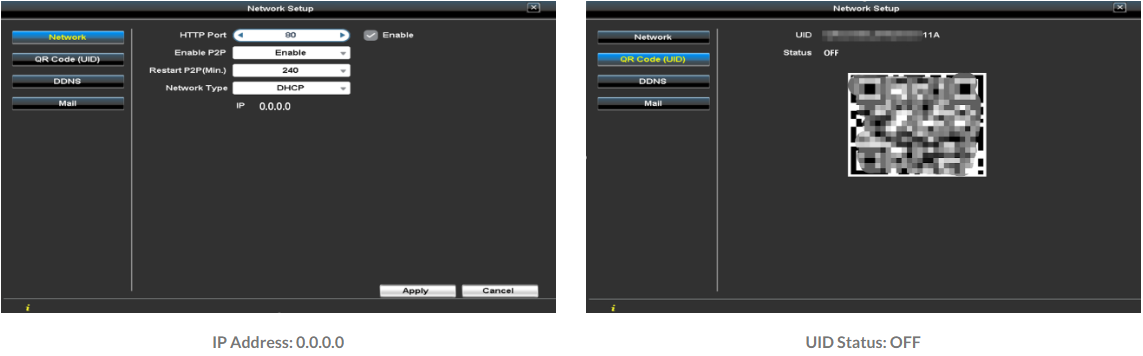
If the IP Address Appears as “0.0.0.0” and UID Status is “OFF”:
Check Connections:
Ensure the DVR is connected directly to the router, not through a WiFi extender.
Direct Connection Issues:
If using a WiFi extender, connect the DVR directly to the router.
If connected directly to the router, try these steps:
Turn off WiFi on your computer and connect the DVR’s Ethernet cable to your computer to check internet access.
Reconnect the Ethernet cable to the DVR and reboot the router and DVR.
Check if a valid IP address appears.
Log into your router to ensure DHCP is enabled (search for your router’s model number + “DHCP” for instructions).
Try different ports on your router.
If the IP Address is Valid but UID Status is “OFF”:
Check Connections:
Ensure the DVR is connected directly to the router, not through a WiFi extender.
Testing and Resetting:
Turn off WiFi on your computer and test the Ethernet cable connection.
Reconnect the cable to the DVR and reset it to default settings:
Go to DVR Main Menu > Maintenance Menu > Maintenance > Reset Default > select OK.
Check if the UID status switches to “ON” and try reconnecting via the mobile app with default login parameters.
If the above steps don’t help, contact us at service@tigersecu.com for remote support. Send us your DVR’s Network Page, QR Code Page, and password, and we will respond within 12 hours.
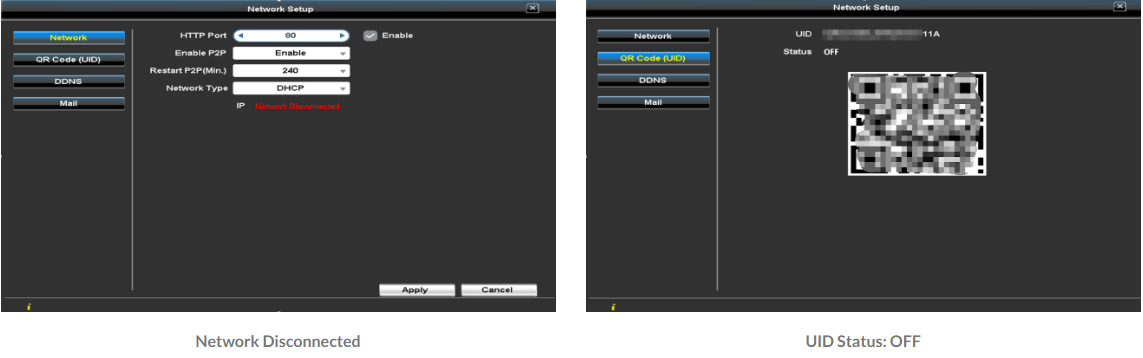
If the IP Address is “Network Disconnected” and UID Status is “OFF”:
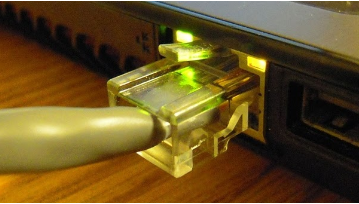
Check Ethernet Port Lights:
Ensure the orange light on the DVR and router Ethernet ports are flashing.
If not, try different ports or a different Ethernet cable.
Need Further Assistance?
For any additional questions, reach out to us at 323-315-0396, Monday to Friday, 9 am – 5 pm Pacific Time, or email service@tigersecu.com. We will respond within 12 hours.
Facebook
Twitter
Email
Print
Tigersecu
2 thoughts on “Resolving 2MP DVR Network Connection Issues”
SAS says:
Hi, I’m accessing my system remotely and have never had issues before but now instead of live images from each camera, there is a static picture of the tiger logo on each camera feed. The internet is working. What is going on.
If the TIGERSECU LOGO is visible on all channels, proceed to check if the cameras are receiving power by activating the night vision IR LED lights. This evening, look for the red glow on the front of the camera lens, indicating that the IRs are powering up.
1. Red Glow Present: If you observe a red glow on the camera lens, please reply to this email with the brand and model number of your cameras, and we will investigate camera compatibility.
2. No Red Glow: If there is no red glow, it suggests that the cameras may not be receiving sufficient power to support all units. Focus your troubleshooting efforts on power-related issues. Initially, ensure that your cameras and DVR use separate power supplies, as trying a different power supply often resolves such issues.
A 12V 5A power supply can power up to eight standard security cameras. You may consider using this TIGERSECU 12V 5A power supply, available at: https://www.amazon.com/dp/B07JJQGVBQ


2 thoughts on “Resolving 2MP DVR Network Connection Issues”
Hi, I’m accessing my system remotely and have never had issues before but now instead of live images from each camera, there is a static picture of the tiger logo on each camera feed. The internet is working. What is going on.
If the TIGERSECU LOGO is visible on all channels, proceed to check if the cameras are receiving power by activating the night vision IR LED lights. This evening, look for the red glow on the front of the camera lens, indicating that the IRs are powering up.
1. Red Glow Present: If you observe a red glow on the camera lens, please reply to this email with the brand and model number of your cameras, and we will investigate camera compatibility.
2. No Red Glow: If there is no red glow, it suggests that the cameras may not be receiving sufficient power to support all units. Focus your troubleshooting efforts on power-related issues. Initially, ensure that your cameras and DVR use separate power supplies, as trying a different power supply often resolves such issues.
A 12V 5A power supply can power up to eight standard security cameras. You may consider using this TIGERSECU 12V 5A power supply, available at: https://www.amazon.com/dp/B07JJQGVBQ